‘Good Day Dynastar Fans:’
Today we will report from the magic repair bench and discuss the maintenance of vacuum tube guitar amplifiers. Hooray! Tubes! Toobs! Toobz! The heart of darn good music.
So you have a tube amp and have been consistently gigging three times a week for months on end. Finally one gigging evening the Dyna-Bench gets the complaint on the following day:
“Dude.. I was playing, and the (CENSORED) volume dropped and (CENSORED) smoke came out of the back of the amp”
Then from another: “We were practicing and the sound just stopped, but the power was still on”
And the typical: “I heard a horrible sound, and the amp just quit”
Hmmppff… Okay then……. From time to time tube amps, as tough as they are need some TLC, and they eventually wear out. Yes, in time solid state amplifiers also get fatigued along with their associated components and also wear out.
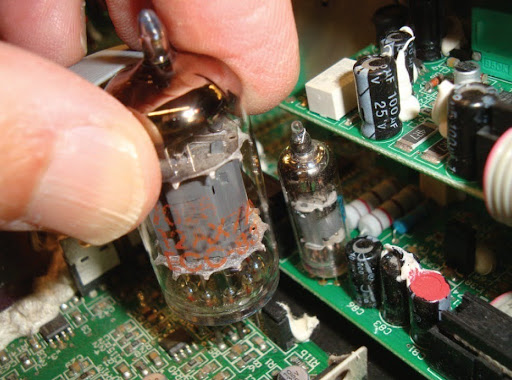
So here is what we do to an amp when it gets on the magical ‘Dyna-bench’. We look for any preamplifier tubes that have ‘whited out’ and lost their internal silver top coating (called ‘getter’) and check for that. If so, it indicates a vacuum leak breach in the glass tube- technically called the ‘envelope’. Sometimes the silver is on the side and not on the inside top of the tube. If the preamp tubes look bad- they gotta go. If they are really old.. like 30+ years, they are probably fatigued, and it’s probably time to replace them, unless you’re touchy about them.
Next we pull the output tubes (power tubes), and test them for matched performance. You see, every tube has to hold its own. For instance an amplifier that has four output tubes is built for each tube doing ¼ of the work to get the signal to the loudspeaker. An amplifier with two tubes is doing 50% of the work, and of course baby guitar amplifiers with one output tube are doing 100%. If the tested tubes match within 5%, are not faulty, that is great news, and we put them to the side for re-use. If one of them is out of whack, we usually replace the set with a matched set.
Matched output tube (quad) sets allow you to throttle the work of tubes so they equally share the load of work. If they were not matched, then one of the tubes may be doing more work than the others, run hotter, then go south before the others do. We want all the tubes to age and wear out together. This saves cost in the long run, and runs the amp nicer. Tubes can get expensive, especially when we are talking about say an Ampeg SVT bass amp that has 6- 6550’s. That’s a hefty parts bill.
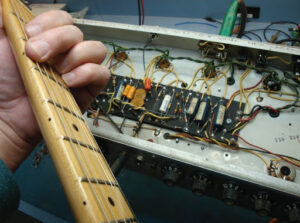
Now aside from this, we need to look over the associated circuitry and make sure of the passive components. are not out of tolerance, or damaged which actually may have damaged the tube in the first place. We’ll also make sure the filter capacitors in the power supply are strong, and no electrolyte leaks. If so, we’ll recommend a ‘cap job’. When all is checked and we get the green light for live testing, we move on.
Before replacing the tubes, we treat each pin of the tube with a special contact treatment solution which reduces or eliminates any arcing that may occur between the vacuum tube’s pins and it’s associated socket. Arcing is bad, and causes issues, and can turn catastrophic at any time. Treatment helps suppress that issue, and eliminates intermittent scratchy sounds coming through the amp while you’re playing through it. Tube amplifier circuitry has a lot of high voltage contact connections in it.
Now we come to bias. We have to look at the tubes that are either installed or new, and adjust the bias. The bias is essentially setting the throttle (like the idle in a car) to the proper level. There are guitar amps that can actually allow you to adjust the bias for each output tube. This would allow you to use unmatched tubes BTW, and you can match them using circuit control mechanisms. Most amplifiers allow you to adjust the bias for all tubes all at one time with one control, not individually.
Yet some amplifiers will have a couple of controls to adjust the bias in pairs. This is why matched tubes are necessary.
Now some amplifiers are “Self Biased” and are not adjustable which is nice, but you must replace the vacuum tubes with the correct ratings specified by the manufacturer to ensure the set bias matches the tubes correctly when installed (Think Mesa Engineering or amps with EL-84’s). Never install a new set of tubes without ensuring they have the same plate current as the old ones were. Theoretically it would be fine to do this without re-biasing, but I’m iffy about that. Always best to calibrate the tubes to an amplifier’s circuitry. If the tubes are incorrectly specified, three things could happen: The tubes run cold, and the guitar amplifier tone is lifeless and has low power output, or the tubes run hot and get fried, or finally they could be close or right on, and work fine. Let’ s bet on the side of caution.
Now back to adjusting the bias. It is important to service the bias control(s) themselves during the biasing procedure, otherwise you can get intermittent problems, and even damage to a new set of tubes. We do that after a good warm up. Nothing worse than an amp coming back with a customer: “Hey they are all glowing red”
Finally, we adjust the bias for the tubes based on their specification, make sure it is stabilized, and then run a full power test for several minutes to stress test circuitry. The oscilloscope additionally gives us a visual picture of your amplifier’s signal and we can examine it’s integrity as well. If good, we do a live test through a speaker cab, and crank it, test the controls of the amp, and then get a pleasantly satisfied feeling knowing the customer will have a big smile on their face. When the customer gets the amp back it is stage ready.